Instead of having an ugly subdomain, you can give your blog a pro look with a custom domain name. You can easily get a domain name from bigrock and park it to your blogger blog within minutes.
So, Did you get your domain name and want to add it to your blogger blog? Below are the complete steps on adding a bigrock custom domain name on blogger.
If you are still planning to get a domain name for your blog then you can simply get it on 25℅ discount using Vipinmishra.net as a coupon code.
 |
| How to Add Bigrock Domain to Blogger |
Getting Started: Add Bigrock Domain to Blogger
1. First of all, Login to bigrock control panel and click on your domain name under the list of orders. In this tutorial, I am adding my own domain Vipinmishra.net to Blogger.
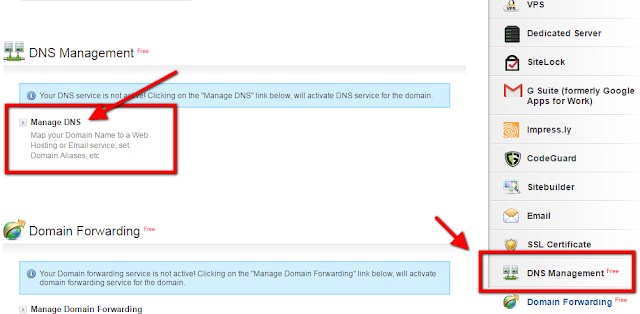
2. After that, Select DNS Management from the menu located on the right side and then click on Manage DNS.

Now, a new pop-up window will appear. Here you'll have to add A Name and CNAME records to map your bigrock domain to Blogger accurately.
3. So, click on Add A Record, leave the Host name blank and enter 216.239.32.21 in the Destination IPv4 Address. don't change the TTL value and click on Add Record.
4. Following the same procedure, add 3 more A Name records using the below Destination IPv4 Addresses.
216.239.34.21
216.239.36.21
216.239.38.21
After adding all the A Name records, it should look like the below screenshot.

5. On the same screen, click on Add CNAME records >> Add CNAME Record. In the host name type www and selecting the second radio button, type ghs.google.com (See below screenshot for reference). Now, click on Add Record.

6. Now, Log in to blogger dashboard and select your blog on which you want to park the domain. Go to Settings >> Basic & click on +set up a third party URL for your blog. Enter your domain name there with www. Click on Save and you will get some error like below screenshot. It will suggest you to add 2 CNAME records. we have added first one in the Step no. 5 already and thus, will have to add the second one only.
7. Again, Go to bigrock control panel and add 2nd CNAME record following the same procedure used in step no. 5. Enter the host name and value given by blogger. finally, click on Add Record.
8. Now, head over to the blogger dashboard and click on Save in the third party URL set up option. It will be saved for sure if you have followed each and every step properly. In some cases, It may take up to 4-6 hours.

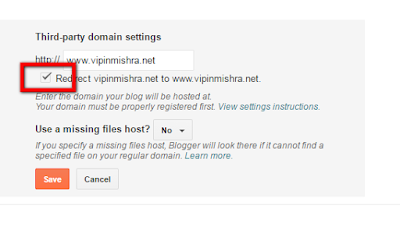
9. Don't forget to enable redirection to www from naked domain by checking Redirect domain.com to www.domain.com option.

That's all under parking a bigrock domain to blogger properly. I have kept the steps clearly and still, if you are facing problems or issues with any of the steps, kindly comment below and I will be happy to help you.
Your friends may be looking for such a tutorial to add bigrock domain to blogger. Be a good friend and share this tutorial with them.
How to Add Bigrock Custom Domain to Blogger - 2017
 Reviewed by Vipin Mishra
on
23:20
Rating:
 Reviewed by Vipin Mishra
on
23:20
Rating:


Nice Tutorials ....... help for newbie Blogger ...... Thanks :)
ReplyDeleteThanks Mukesh for the Compliment. Keep Visiting For More Tutorials :)
Delete